WELCOME

Welcome to my blog.

If you came here expecting to see Photography Photos you will need to visit my PHOTOGRAPHY BLOG at:

Thank you for stopping by & visiting. I appreciate you interest and your comments. Have a great day.

Dec 31, 2024

Wrapping up Christmas - Part 2

 Thanks for stopping by.

Well here we are at the end of another year.  I'm sharing today the last 2 Christmas cards that I made for 2024

Card #1


First up is this wonderful Nativity card - (Unity Stamps - Born For Us).  
Card Base: Gorgeous Grape, Patterned paper is from an old pad I've had for years.
Image Stamped with Memento Tuxedo ink & colored with pencils.  Added white snow splatters and some sharing.  Stars in the sky have tiny gems on them. - Added a piece of green/gold rimmed ribbon and mounted with foam tape.  
Dies: Rectangle & fishtail.

Card #2


This was a super CAS card done using: Unity Stamps (Guided by Grace) and sentiment is from an old SU set: (For Unto Us)
Card Base: Night of Navy
Image was stamped on Basic White card stock with Versamark Ink and embossed with Cobalt Tapestry embossing powder.  It's a dark blue with flecks of gold in it. - The sentiment was stamped with Gold ep from SU.  I added some dark blue gems to the sides of the card.  Great for a quick yet elegant looking card.

Happy New Year & I'll be back soon in 2025 with new cards to share.

Dec 30, 2024

Wrapping up Christmas - Part 1

 Welcome.  I'm wrapping up Christmas cards from 2024 today and tomorrow.

Starting off with a couple of Nature themed cards:


Card #1


For this card I started out with the patterned paper for my inspiration.  It's from Unity Stamps, (Rustic Christmas line)
Next I used 2 stamps (Merry Christmas & a Plaid Stamp) both are from Unity Stamp KOM

The card base was Early Espresso. I cut out the patterned paper with a Unity Scallop/Rectangle die.  Circle Dies were used for the sentiment.  That was stamped on Soft Sea Foam cs and embossed with Gold Glitter embossing powder.  The plaid was stamped with Shaded Spruce ink on Garden Green card stock.  I added some pinecones, leaves and a small poinsettia that were punched with various dies and topped it off with a piece of sparkly gold ribbon and a tiny brown pearl.

Card #2


This was one of my favorite cards I made this year.  I started with a base of Old Olive Card stock.  The stamped a piece of Very Vanilla with the pine cone image from the (Festive Flair - Nov. 2023 KOM)
with Memento Tuxedo black ink.  I used retired chalks from SU to color the pinecones and sprayed with hairspray.  I tore a piece of Old Olive and distressed the edges with Old Olive ink and layered that over the pinecones and cut it out with Unity Postage Dies.  Next up I splattered the image with Antique Bronze Distress Spray and mounted that on the card base. - Finally I used the smaller postage dies and Embossed the sentiment with Copper embossing powder and also distressed the edges and splattered the same spray on it. That was mounted with foam tape on top of the stamped image.
It was very shimmery in real life.

Card #3


This one just made me smile as I knew who it was going to right off the bat. So for this I started with a card base of Cherry Cobbler.  Then I found this cool piece of plaid paper in the little goodie bag from Unity and decided to use it for my card.  I also picked out a piece of designer paper (Unity Rustic Christmas pack) but from there I took a snowflake image from the (Wander and Wonder - Sept. 24 KOM) and some Crushed Olive Distress ink and stamped on top of the designer paper.  I tore the edge, layered it over the plaid piece and cut it out with a Scalloped Rectangle die.
The cat image is from Unity (Ho Ho No Pissy Kitty).  I stamped it with Memento Tuxedo Black ink on Basic White card stock and colored with pencils. Cut it out with SU Stylish Die and mounted it over a piece of Old Olive card stock.  Stamped the sentiment on a Fishtail die and added some red enamel dots to complete the card.

Thanks for stopping by. Tomorrow I will be wrapping up with my final 2 cards that I made for Christmas of 2024.


Dec 28, 2024

More Christmas cards.

 Wow it's almost Christmas! - I hope by now you have everything done that needs to be done.


Today's cards:

First up is this adorable mouse image from Unity Stamps September 2024 KOM (Wander and Wonder) Card Details: Ink used, Memento Tuxedo Black. Card Stock - SU Real Red and Basic White,
Dies: Unity Rectangle dies. Pattern paper was from my stash. Snowflake was from a Tag and Snowflake die I received as a free gift with an order from Scrapbook.com I colored the image with colored pencils and blended with Gamsol.  Added some sequins to finish the card off.


Next up is this sweet little deer image, Unity Stamps, (Little Love Deer). The sentiment for this card and the one above are from another Unity set, (Artic Joyride). Card details: Card Stock, SU Old Olive, Cherry Cobble, Crumb Cake and Very Vanilla. Punches are from a set I have so not sure of the source.  Image colored with pencils.  Embossing Folder, Swiss Dot. Also used some green enamel dots, a fishtail die and foam tape.  I lightly brushed a white pigment pad over the embossed panel as well.

Next we have this sweet Penguin image from Unity Stamps, (Artic Affection).  The sentiment was a freebie from Unity in one of their awesome little goodie bags they send with orders. Patterned paper is also Unity (Rustic Christmas).  I embossed the image with Versamark and Detail Black embossing powder and then water colored the images with various SU inks.  Card Base was, Garden Green and I also used some Pretty in Pink card stock as well as Basic White.  Circle Dies and Rectangle dies are from Unity.  I added some pretty glitter and a pink heart gem to complete the card.

Finally finishing off today's cards with another darling deer image:  
For this card I used Real Red, Pretty in Pink, Basic white card stock.
I stamped the image with Memento Tuxedo black ink and colored with pencils blended with Gamsol.  The patterned paper is from, Scrapbook.com Holiday patterned collection.  I also used Unity Scallop and Rectangle dies. Swiss Dot embossing folder,  Unity Grunge Cut tag dies, a small punched star and some baker's twine.

I hope you have enjoyed this group of cards.  I had a lot of fun creating them.


Dec 22, 2024

Non-Traditional Christmas

Hello,  Hope you are enjoying the last few days before Christmas - It's such a busy time of year.  

Today I'm featuring a trio of Christmas cards that are not quite as "traditional" as they feature metallic colors.


First up is a card that I made using scraps left over from a this card from 2020


Here is this years version using the same color scheme.

So for this card I used the same patterned snowflake paper but added an embossed white panel. They used my new Joy die (Unity Stamps) and some paper from SU that has silver lines on it.  Circle dies are also Unity. Added a small shimmer pearl to the center of the snowflake. Sentiment panel is raised using foam tape.


This one is much prettier than the picture shows.  It's done in White and Copper Colors.  The embossing folder was a gift from a friend.  I added copper color splatters to it and some copper toned gems.  The stamp is from an old SU stamp set.

Finally a card featuring Navy, White & Gold for the color scheme.


Patterned paper was purchased at a JoAnn's store.  Snowflake die is from Momenta and I added stickles to it.  Used Gold Embossing for the sentiment which is from an old set from, Lizzie Ann Designs that I've had for years.  Added some tiny gold gems in various places.

All these card really sparkle and shine but it's hard to get good photographs of that.

Dec 20, 2024

Santa Claus has arrived

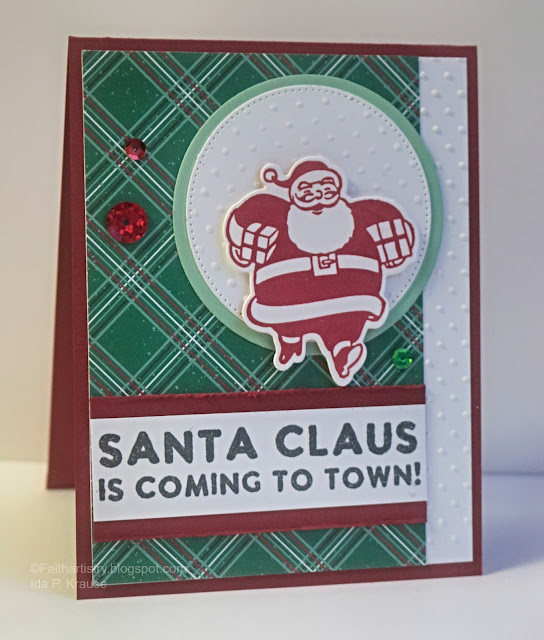
 Hello and welcome.  Yes it's been a hot minute since I've posted here.  I've "finally" finished and mailed my Christmas cards.  Today I am featuring a series of (Santa cards) that I made this year.  You've seen this one already:


I made that way back in November.  Here are the other 4 cards I made using the same stamp set:


All cards feature the stamp set: Simon Hurley - Silly Santas and matching dies.


Traditional Christmas colors were used.  If you need information on papers, etc..that I used feel free to message me.  In the interest of time on these cards I'm leaving out all that information.

Nov 22, 2024

Joy and Peace at Christmas - NBUS#68

 Hello and Welcome.

Today I'm sharing the 2nd card I created based off Lisa Arana's cards:


This one was inspired by the card on the right side of the photo (click to enlarge all photos).

Unity has some awesome paper packs and I really like the one that Lisa used but don't have that one.  Instead I used another of their great paper packets for my card and yes it's a more traditional color palette for Christmas.

I'm using new to me paper and dies for this card so will be including this on NBUS#68

I really liked the distressed feel of Lisa's card and of course that awesome little tag.  So here is what I created using her card as my inspiration:


For this card I layered a piece of (Rustic Christmas) patterned paper onto an A2 size piece of Garden Green (SU) card stock. - I wanted to add a little texture to my card so I changed up my design by adding a strip of Garden Green card stock that was embossed with the Pine branch embossing folder from (Spellbinders).

For my tag I used (Grunge Cut) tag dies from Unity. These are very popular and it looks like they are sold out again.

The sentiment is from an older 2023 KOM (festive flair).

I cut my tag out on Basic White card stock and distressed it with Red paint spritzed with a little water and brushed on randomly with a paint brush. The sentiment was stamped in Memento Tuxedo black ink on another piece of card stock and glued on top of the tag.
I cut out my pine branches, berries and pinecone with Garden Green, Real Red and Chocolate Chip*retired card stock.  The dies are from a set I have from (Momenta).  Then I distressed them with some white paint.  I didn't like how the paint dried so I decided to add some sparkle using Versamark ink and some White Diamond embossing powder.  I used glue to hold them down onto the tag although some pieces are raised up.
Next I tied some silver twine around the tag and used foam mounting tape to raise the tag up on the card.  -  Grunge usually isn't my style but I like how this turned out and hope you do as well.

Again a big thanks to Lisa for sharing her wonderful cards and inspiring mine. - Happy Stamping.


Nov 21, 2024

Poinsettia Magic and Wonder

Welcome! - Today I'm sharing another Christmas card with you.  I took my inspiration from this card:


The card on the left.  -  These cards were created by Lisa Arana from Unity Stamp Company.

I liked the look of the craft cardstock but decided that I wanted color on my card so while I was inspired by her card it is totally different than hers.


See I told you it was quite different.  The things I was inspired by from Lisa's card,  Kraft Card stock, Distressing, Poinsettia, Speckles.

So for my card I used a different poinsettia stamp since I don't have the one she used.  Mine is from the Unity September KOM (wander and wonder).  I stamped it twice on Kraft (Crumb Cake - SU) card stock using Memento Tuxedo Black ink.  Then I colored the image with 2 Prisma Colored pencils.  One pink one and one mint green one.  I blended the color with a blending stump and Gamsol.  Next up I splattered it with white paint diluted with a little water and used a tooth brush to splatter by running my finger down the brush (messy but fun).  Next up I also added some splatters of Antique Bronze Distress ink (Tim Holtz) using the toothbrush but no water this time.
Finally I added some Nuvo Dream Drops (Cloud) and sprinkle on some clear white diamond glitter to the center of the flowers.  I let that all dry before assembling the card.

My sentiment is done the same way and is from the same KOM. I used a Banner die (MFT) and layered it with foam tape over the image panel.

Colors of card stock used:  Pretty in Pink and Mint Melody (oh I miss that one from SU). Pink and Mint are some of my favorite colors together.  I also distressed the edges of the craft panel using a distressing tool (retired from SU).
Oh I almost forgot the small pink pearls.  I've had these for years so I'm not really sure where they are from.  The little one is super tiny.


                A close-up of the sparkle and shimmer on this card.

That's the scoop on how this card was made.  Come back again as I will be featuring another card inspired by Lisa from the right side of the photo shown at the beginning of the post.

Thanks Lisa for the "inspiration" and thank you for stopping in to check out my cards.  - Happy Stamping!

Nov 13, 2024

Simply Holiday Deer - NBUS#68

 Welcome!

 I'm here on the blog today sharing a couple of Christmas cards.  I'm in Christmas card mode right now so you'll be seeing a lot of them in the next few weeks.

I have 2 cards today both made with the same stamp set:
Simply Holiday Deer from Unity Stamps Uniquely Unity 10/24 Kit.


Submitting to NBUS#68 since this is a brand new stamp set and a brand new paper pack on the first card.

Card 1:


Details: Stamp Set - Simply Holiday Deer (Unity Stamps)
Card stock: Real Red and Basic White (SU)
Designer Paper - Unity (Rustic Christmas)
Ink: Memento Tuxedo Black
Other: Prisma Colored Pencils, Gamsol, White Luster Brush,Tiny Gems, Glitter, Foam Tape.

For this card I made my own snow template and blended on some blue ink to create snow banks.  It's hard to see in the picture but there are also white splatters and glitter accents on the trees and deer antlers.  I colored the image with pencils and blended with Gamsol.

Card 2:


This card used the same stamp set, (Simply Holiday Deer) except for the sentiment which came from Unity (Winter Cheer and Deer)
Card Stock: Poppy Parade, Crumb Cake (SU) and I'm not sure what Green I used but it's from (SU).
Designer Paper - Purchased at JoAnn's - Funny story to follow on the paper.
Ink: Memento Tuxedo Black
Colored Pencils,  White Lustre Pen, Glitter, Circle Punches (SU), Dies from Unity. Ribbon (American Crafts) and some small staples.
Again this card also has glitter on it.

So here's the funny story about the paper.  One day my bowling partner showed up with a shirt that reminded me of the paper I had.  She wore it again this week so I had to get a picture of the paper and her shirt:

Here is my paper:


Here is her shirt:


Very close resemblance wouldn't you say! She got a kick out of it when I showed her the paper pattern.


Nov 4, 2024

Halloween Cards

Today I'm sharing the last 2 cards that I made and sent out to people for Halloween this year.

First up a super easy "no stamping" involved card.


 This card was done using Unity Stamps Patterned Paper (Haunted Hues) and ( Chronicles of a Ghost - Ephemera Kraft packet. )

Card Base: Basic Black Card Stock (SU) I then layered that with a piece of the Haunted Hues paper that I distressed with some Crushed Curry ink as the ghosts in the pattern were super white and I wanted them to match the ghost from the ephemera packet.  

I layered the ghost paper over a piece of Pumpkin Pie card stock that I had embossed with Basket Weave Die (Concord and 9th

I then used a Unity Scallops and Circle die to cut out the ghost from the Epherma pack .  I also cut out the boo sentiment from the same pack and distressed the edges with some pumpkin pie ink.  I mounted the sentiment and ghost with foam tape and added some gems that were given to me.

Card #2


This one uses a very old Amuse Studio stamp set called, Spooky Boo Day. - I had received a card with this layout from an Amuse Studio demonstrator once and liked the layout.  I did change it up a bit to make it my own.

Card Base: Only Orange (retired SU - which I miss), Granny Apple Green, Lemon Lime Twist and Basic White.

I used the Polka Dot circle plate from Concord and 9th and then stamped the bats in Black ink over the top of the embossed piece after I had the rest of the layout in place.

The tree was stamped with Granny Apple Green ink, the owl in Smoky Slate, the Pumpkin in Only Orange.  I added a strip of the Granny Apple Green to the bottom of the tag, some yellow glitter to the pumpkin and some yellow/orange gems to the tree to complete the card.

That's it for today's cards. - I'm working on Christmas cards now so you should be seeing them in the future.


Thanks for stopping in. - Please check to make sure you are not set to (no-reply) for commenting.  Although I am aware that this is a problem with possibly Google.  So if I don't contact you directly when you comment just know I appreciate your comments very much.

Nov 1, 2024

Paper Players #713 and NBUS#68

 Welcome!

Today's card is going into the Paper Players #713 sketch challenge and also NBUS#68


Here is the sketch:


Below is the card that I made for these challenges.


My very first Christmas card of the season.  I'd best get busy on my stash!


For this card I used a set of stamps that I bought last year after I had completed all my Christmas cards so this is it's first time being inked up.

Card Base: Real Red, Other colors used: Basic White and Mint Melody (retired) Designer Paper from SU from a couple of years ago.

Stamp set:  Simon Hurley - Silly Santas and matching dies.

Inks: Real Red, Memento Tuxedo Black

Other: Swiss Dot Embossing Folder, Circle dies, foam tape, sequins

Getting this in under the wire so if you have questions about it feel free to email me.


Oct 31, 2024

Color Throwdown#817 and Double D Pumpkin Challenges

Hello and Welcome.

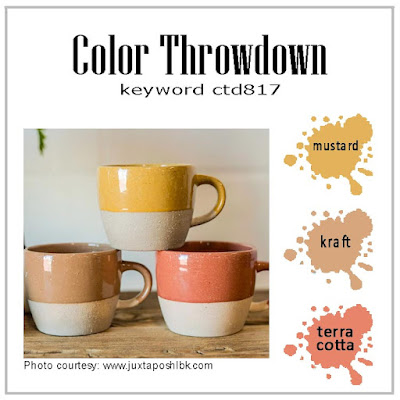
Today's card is being shared with the Color Throwdown#817 


Below is the card that I created for these challenges:


For this card I started with a base of Cajun Craze card stock.  Then I cut out a piece of More Mustard card stock with a Unity Scallop Rectangle die.  I stamped the pumpkin image on Crumb Cake (kraft) card stock with Memento Tuxedo black ink and colored with pencils blended with Gamsol.  Then I splattered white ink on the image and cut it out with a circle die from MFT.  

I layered a piece of designer paper (DCWV - Pumpkin Patch) and punched out a border of pumpkins (Martha Stewart) with the Cajun Craze cs. I wrapped some twine around that and mounted the panel with foam tape after stamping the Sentiment.

The Pumpkin and Sentiment images are from Unity Stamps Sept. 2024 KOM - Wander and Wonder.

To finish the card I added some sequins.

Thanks for stopping by.  I always appreciate your comments. - If I don't send a personal thank you back I just want you to know how much they mean to me. On a side note: Make sure you are not set to (no reply) because then I can't send a personal thank you back.

Oct 30, 2024

Halloween Bats

Hi,   Today I'm sharing a Halloween card that is CAS (Clean and Simple) card that I created.  


 I struggle with CAS designs so this may not be a totally CAS card but for me it it is.

Stamps used: Unity Stamps - August KOM - Thanks in all the things.
Card Stock: SU - Granny Apple Green, Basic White
Designer Paper - DCWV from my stash & a textured piece of black card stock purchased at Hobby Lobby.
Inks: Granny Apple Green, Lemon Lime Twist, Daffodil Delight (SU) Memento Tuxedo Black
Other: Blending Brushes, White Lustre Pen, Amber gems, Foam Tape.

I stamped the image with black ink and used the colors of ink listed and blended them with a blending brush.  Splattered the white with the Lustre brush.  Added a strip of the designer paper to the textured black paper and glued to card base.  Glued the gems on the dp and used foam tape to raise up the sentiment. - Quick and fairly easy.


This shows the detail of the textured black paper as much as I could get.

Hope you like my version of a CAS card. - Happy Stamping.

Oct 23, 2024

Two Old Bats Anything Goes Challenge and NBUS#67

 
Welcome!  I'm back today with another card for the Two Old Bats Anything goes Halloween challenge.  

I wanted to do a card inspired by the mood board this time.  

Below is the card that I created.


This is also going in NBUS #67 as I'm using a new stamp/die set for this card. - Which I am so thankful to TK (Time 4 Kards) for gifting me this adorable stamp set and the dies that match.  She created a card with this set last year which you can view here:

I had a blast creating this card.  

My card base is: Highland Heather (SU)  The designer paper is from DCWV - Spooky time stack.  I purchased at JoAnn's a couple of years ago.

My card process often takes on a mind of it's own as I had started with a totally different pattern of paper but didn't like how it was turning out.  Then I decided to switch papers and am happy with the result.

The images were stamped with Memento Tuxedo Ink and colored with various Copic markers and cut out with the matching dies.

I blended Fresh Freesia and Misty Moonlight ink (SU) on a piece of white card stock.  Then cut it out with a Unity Die.  I also added a cut our border in black like a frame.  Before adding the frame I splattered on some white splatters using a Lustre Brush from Scrapbook.com - I was excited to finally get a night sky that I liked. All the images were mounted onto the sky with foam tape.  I added some sequins to the background as well. I also added shimmer to the ghost with a Wink of Stella pen.


I finished off the inside of the card with the spider and web from the stamp set: Waffle Flower - Boo stamp set/dies.  The sentiment is from an old stamp set from Amuse Studio (Spooky Boo Day) .

Again this card was a lot of work but I am thrilled with how it turned out and I hope you enjoy it too.


Oct 21, 2024

PP#712 & NBUS#67

 Hello and thanks for stopping by.

Today I'm sharing a card I created for the Paper Players #712 challenge (Clean and Simple - Tag Your It).

I'll also be posting on NBUS#67 because I used new stamps today for this card.


Here is my card:


For this card I started with a card base of Pumpkin Pie cs (SU) and layered that with a piece of Unity designer paper (Haunted Hues) that I cut out with a Scallops and Rectangle die from Unity Stamps.

I used one of the "freebie" tags that Unity sends as a little bonus and stamped the cute little ghost on it with Memento Tuxedo black ink.  Then I colored with with Prisma Color Pencils and blended with Gamsol.  I stamped the Boo sentiment with the same ink.  Next I took an oldie but goodie stamp from (SU) Itty Bitty Backgrounds and stamped it with Night of Navy Ink.  I also distressed the edges of the tag with Fresh Freesia ink (SU).  I just had to use the cute little cat from the stamp set (Boo to You) so both the little Ghost and cat were used for the first time.

I had previously used the sentiment and another ghost from that set on this card but wanted to share the remaining stamps in this set.
To complete my card I added some ribbon (source unknown) it's been in my stash forever.  I mounted the tag using foam tape.


Here is a closeup of the image so you can see the color detail a little better.


Be sure to check out the design teams great cards and pop by a few participants blogs as well.

Have a wonderful day.

Oct 10, 2024

Two Old Bats Halloween Challenge and NBUS

 Hello and Welcome.

Today I'm sharing a card I created this week and decided to share it for the Two Old Bats Halloween Challenge: Anything Goes.

This was the Mood Board - It's there for inspiration.  - I'm thinking that mine is more of an, "anything goes" card rather than matching the mood board.


Which photo do you prefer? One with the background paper added or the one below?


Inside of the card.  Here I used another small circle that I cut out from panel that I cut the first circle from.  Then I just inked up the small Trick or Treat portion of the sentiment stamp with a black marker and stamped it below the ghost circle.


So for this card I used Basic Black, Basic White and Granny Apple Green card stock (SU).  The background stamp is from Unity (Boo Brigade)  I stamped the background with Memento tuxedo Ink twice. I cut one out using a Unity (Scallop and Rectangle die)  I cut a circle out from the 2nd one using the Unity (Scallop and Circle) dies.

Then I colored the smiling ghost with Copic markers and added some clear glitter (Art Institute) over it to make it sparkle.  I cut out a rectangle of Granny Apple Green card stock with another Unity(Scallop and Rectangle) die. I mounted the cut circle over the other ghost background with foam tape,  lining the ghosts up as closely as possible.

Then I stamped the Happy Halloween sentiment from (Clearly Unity - Boo to You) after masking off the small trick or treat portion with Memento Tuxedo black ink.  I removed the mask before stamping down. Then I distressed the edges with a distressing tool and some Granny Apple Green Ink.  To complete the card I added some green sequins (Picket Fence Studio).

Since it's NEW to me I'm also submitting for NBUS#67 - Stop by as there are lots of great cards there to get inspiration from.


That's it. - A fun and fairly easy Halloween card that makes me smile. I hope it does you as well.